
I recently finished a 7 week class called "The Medium of Memory." ITP students may know this class as "the one where everyone cries," and that was maybe true. But I took this class with a singular goal in mind, which was to create a magical data visualization for my memory archive.
Since January 1st, 2020 I've taken one second of video every day. Yes, including COVID lockdown. By using the app 1 Second a Day I can compile these clips into a scrollable view of my life's movie. I like flipping through this app to see what I did on this date 1 year ago, 2 years ago, etc. Or to see how I spent my last few birthdays, or to be reminded of mundane hangouts with friends.
 [Some screenshots of my 1 Second a Day video timeline]
Inspiration
Since starting at ITP I've been planning to build something physical to play with this memory dataset. There's so many iconic representations in pop culture that relate to memories, or conversely, to visualizing the future. To name a few:
- Crystal balls
- Magic mirrors
- Memory balls from Disney's Inside Out
- The Harry Potter pensieve
- ... and the photo albums with moving pictures in Harry Potter
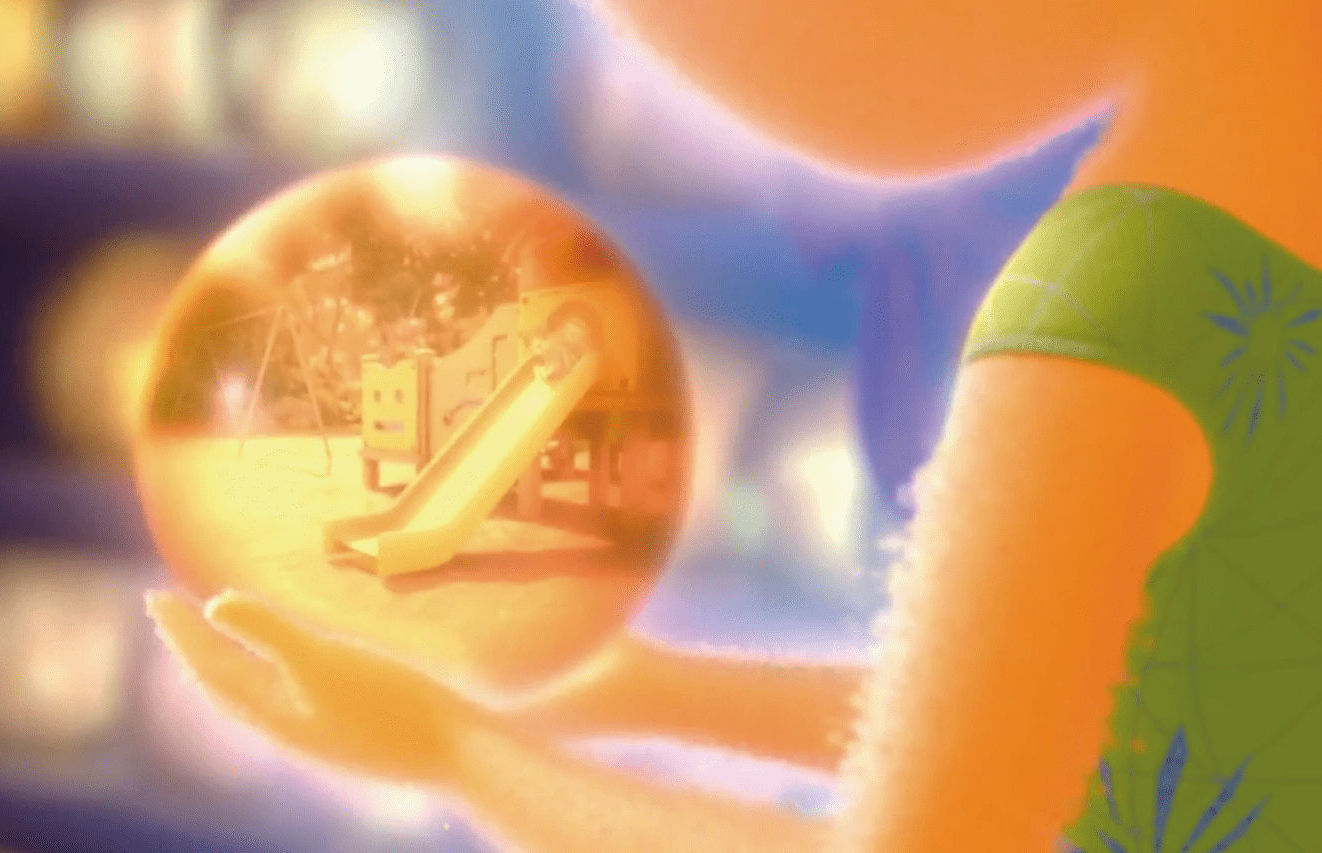 [A happy memory replaying in a ball in Disney's Inside Out] [A happy memory replaying in a ball in Disney's Inside Out] |
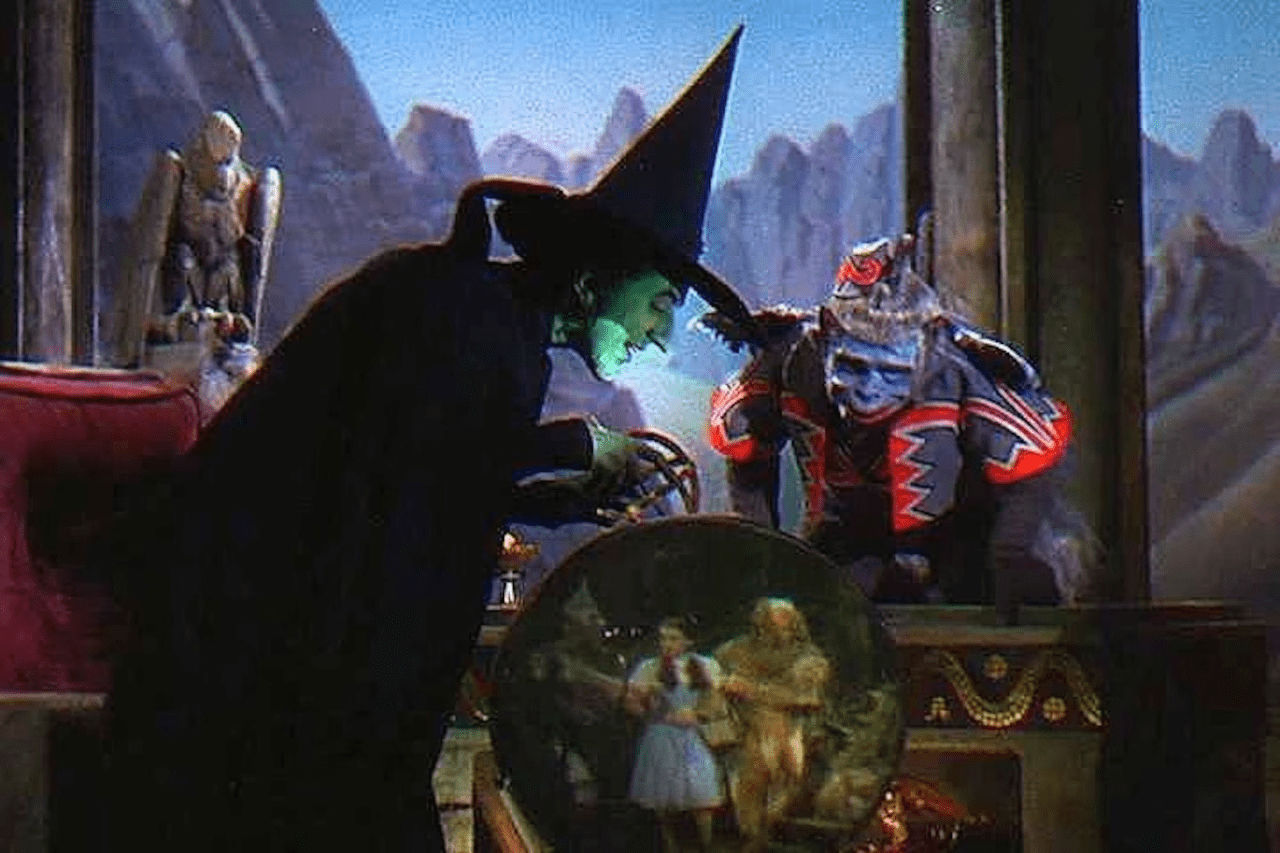 [The crystal ball from The Wizard of Oz] [The crystal ball from The Wizard of Oz] |
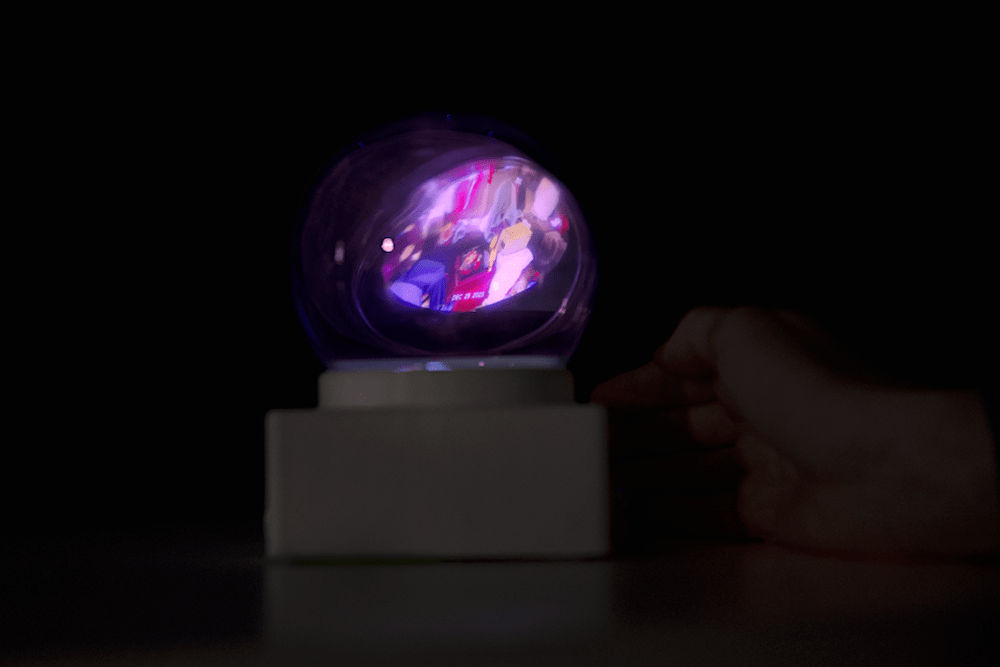
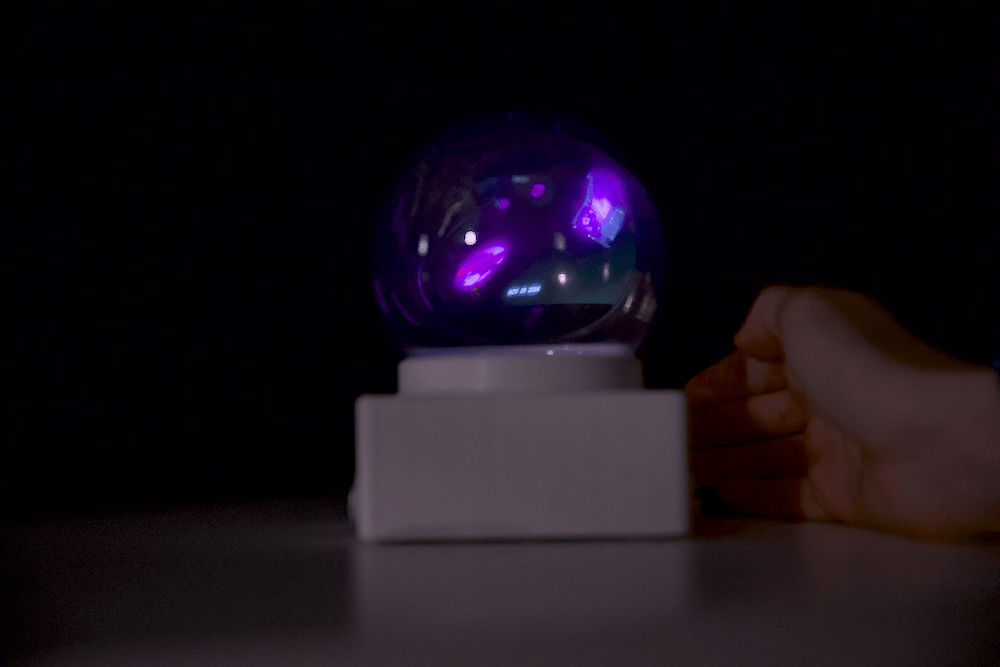
I chose to experiment with a crystal ball form factor because it's a well known symbol, and I like that it normally represents the future rather than the past. My goal was to display all of my 1 Second a Day memory snippets as holograms inside of a crystal ball, with a magical form of interaction to navigate through the video archive.
When I picture a crystal ball, I imagine a fortune teller moving their hands around it in a mysterious way as they try to see the future. I wanted to control the playback of my 1 Second a Day life movie via similar mysterious hand movements. No buttons or screen interface.
I wanted the ability to fast forward or rewind through the video at various speeds, to navigate through the past 5 years of my life in the blink of an eye or day by day. Another goal was the ability to focus on a single 1 second clip and have it loop back and forth repeatedly, like a Boomerang style video.
 [A fortune teller's hands around a crystal ball]
Video Editing
My first step was to export almost 5 years worth of 1 Second a Day clips from the app into a single video file... which was a whopping ~40GB at a good resolution. Next I imported this file into Adobe Premier to explore the file.
Naively, I thought that the app would export a compilation where every clip was exactly 1 second long. That wasn't the case due to something called variable frame rate. I don't fully understand why this is the case but mobile devices don't like to use a constant frame rate (CFR). I set my Premier project settings to 30FPS but the true frame rate was something like 29.7FPS after averaging the variable frame rates of the clips.
That was a huge problem because to build my magical hand controls, I'd need to jump between 1sec clips with code and very precise math to calculate frame number. If some clips had an extra fraction of a second, that would slightly disrupt the math. Which may not sound like a big deal but those fractions of seconds add up to a large time offset over the duration of a 32 minute video.
The only way I saw to fix this was to manually trim every clip to be 30 frames (1 second).. oof. Give or take a few frames every so often, because I could account for small offsets with the code as long as they didn't snowball into a large time offset. It took about 2 hours to trim all of the clips! Maybe there's a faster way to do this, but I'm not a Premiere expert.
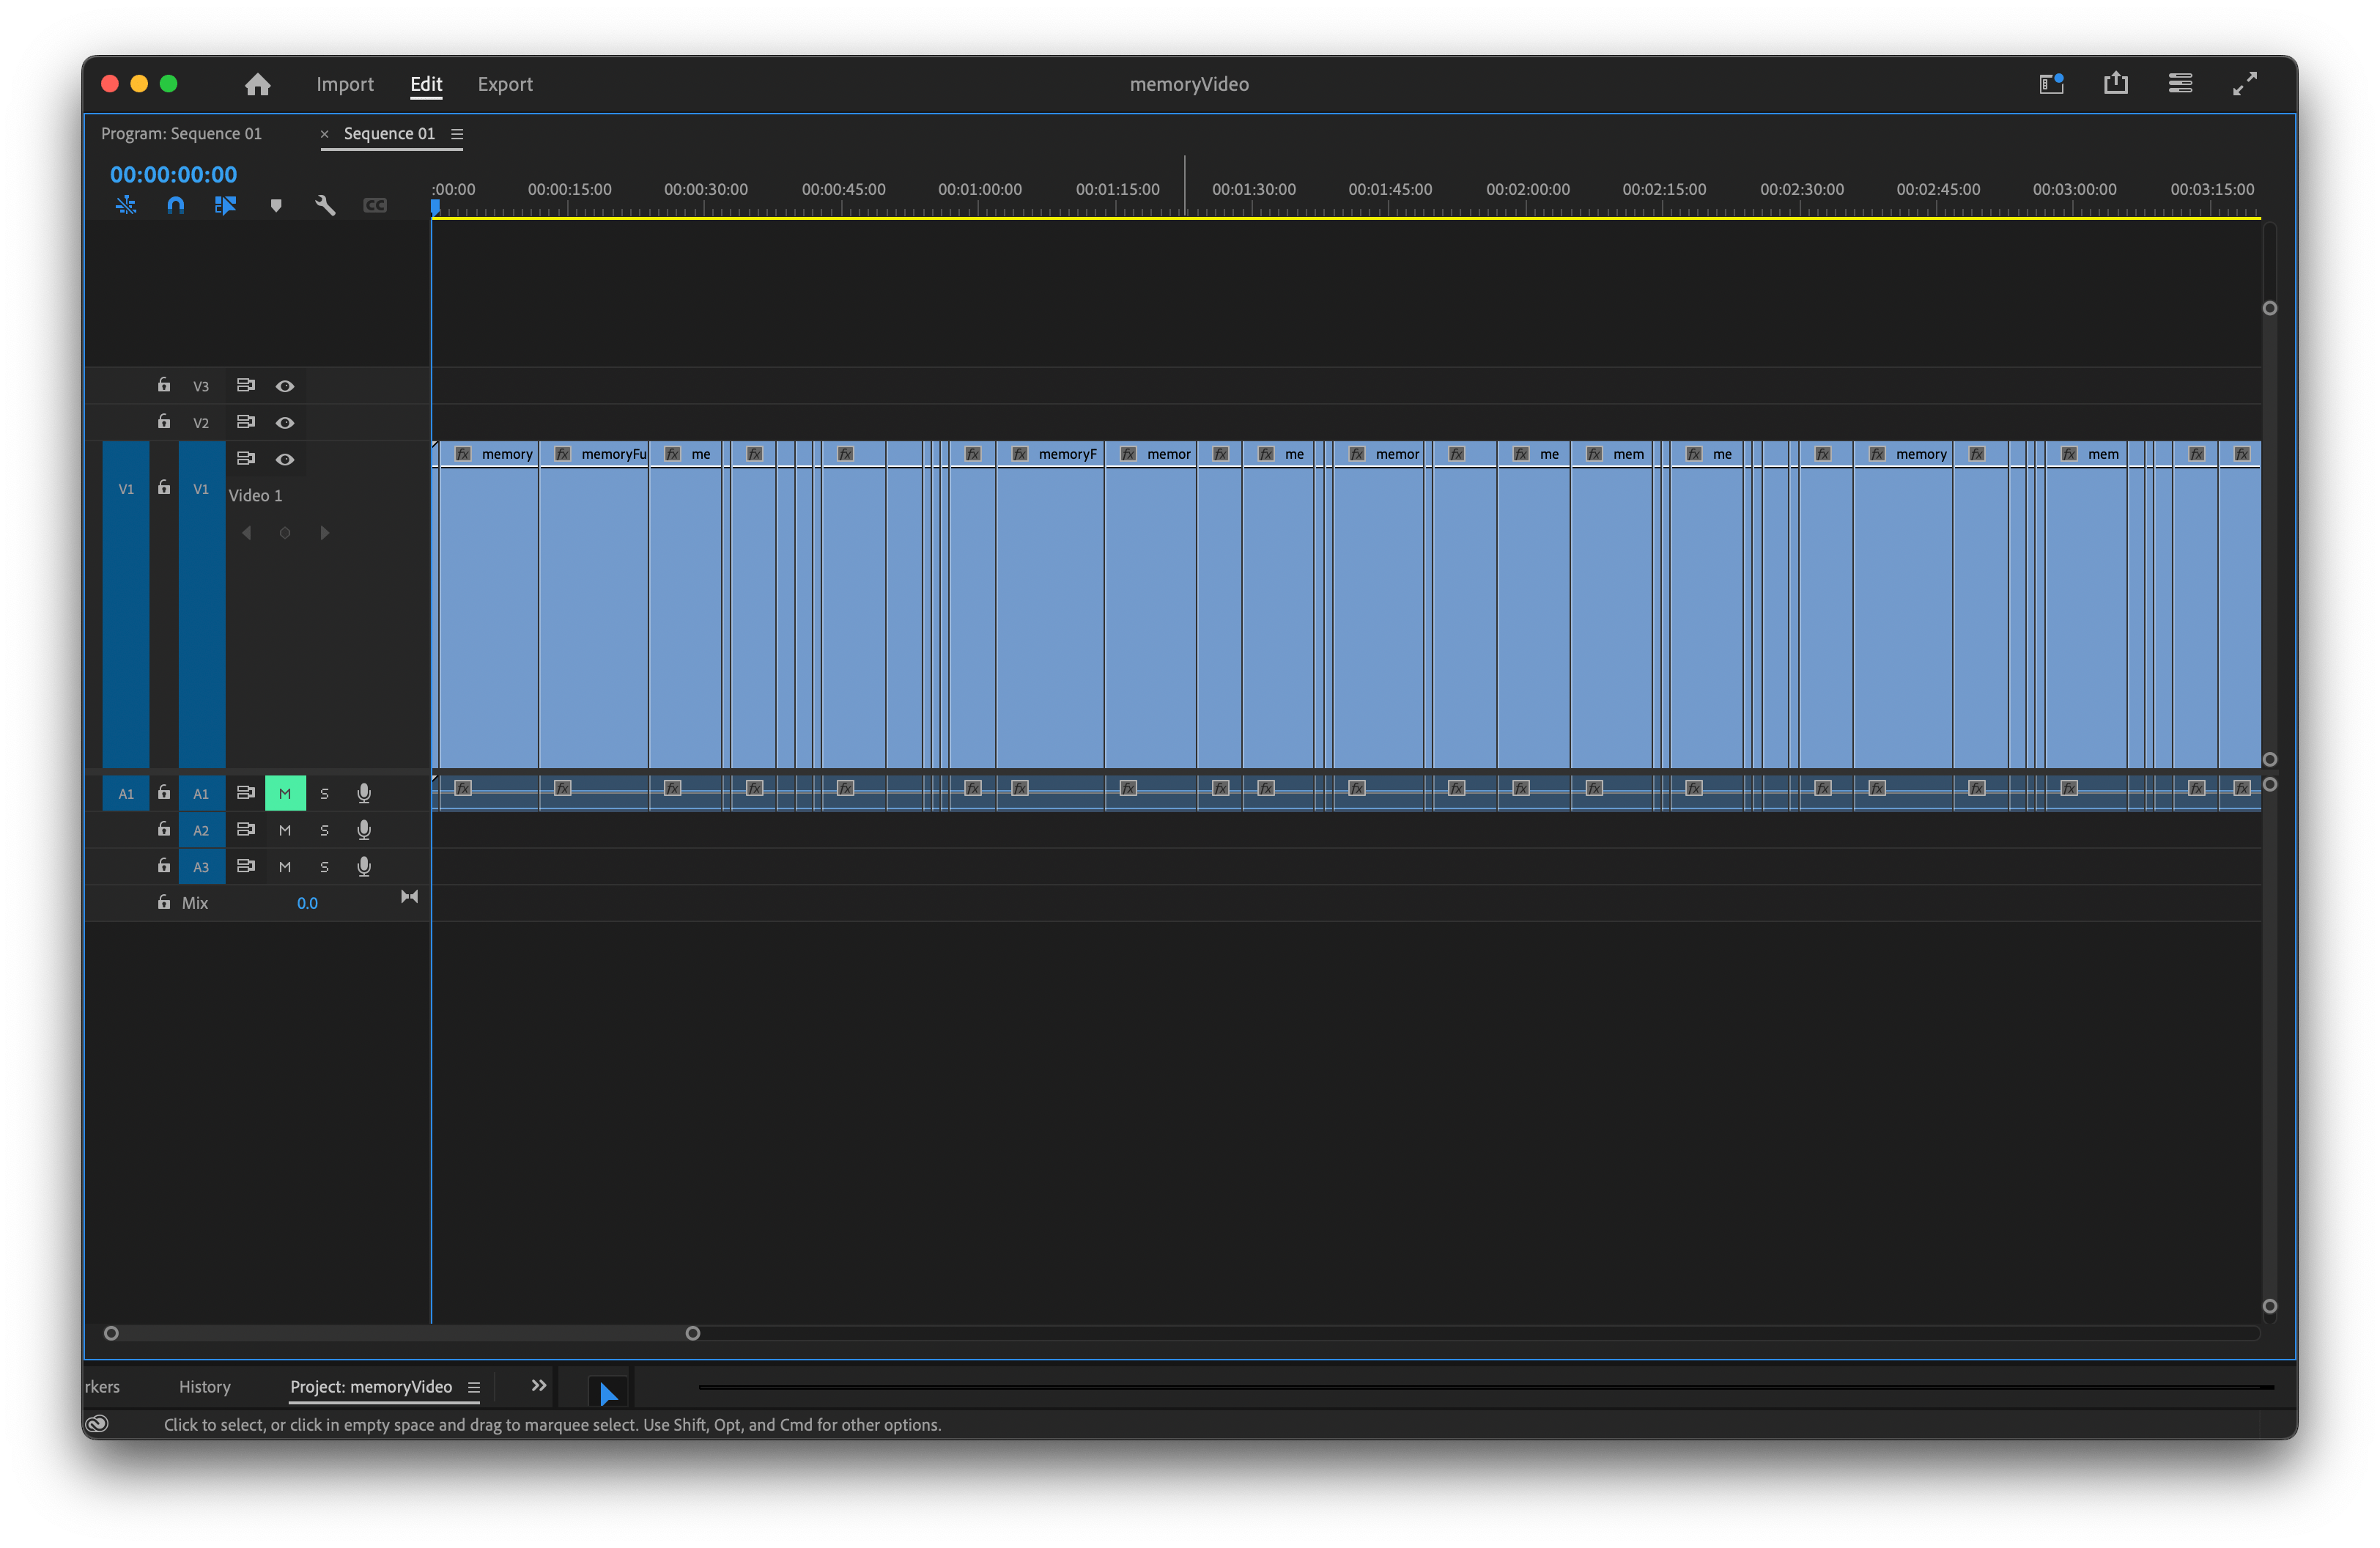 [Adobe Premiere video editor, where I trimmed each clip to actually be 1 second]
Even after trimming all of the clips, the video file's metadata was showing its frame rate as 29.7FPS. I found a handy piece of software, HandBrake, that allows you to convert a video to a specific CFR. Finally, I had a video file with a constant 30FPS where each memory snippet was exactly 1 second long.
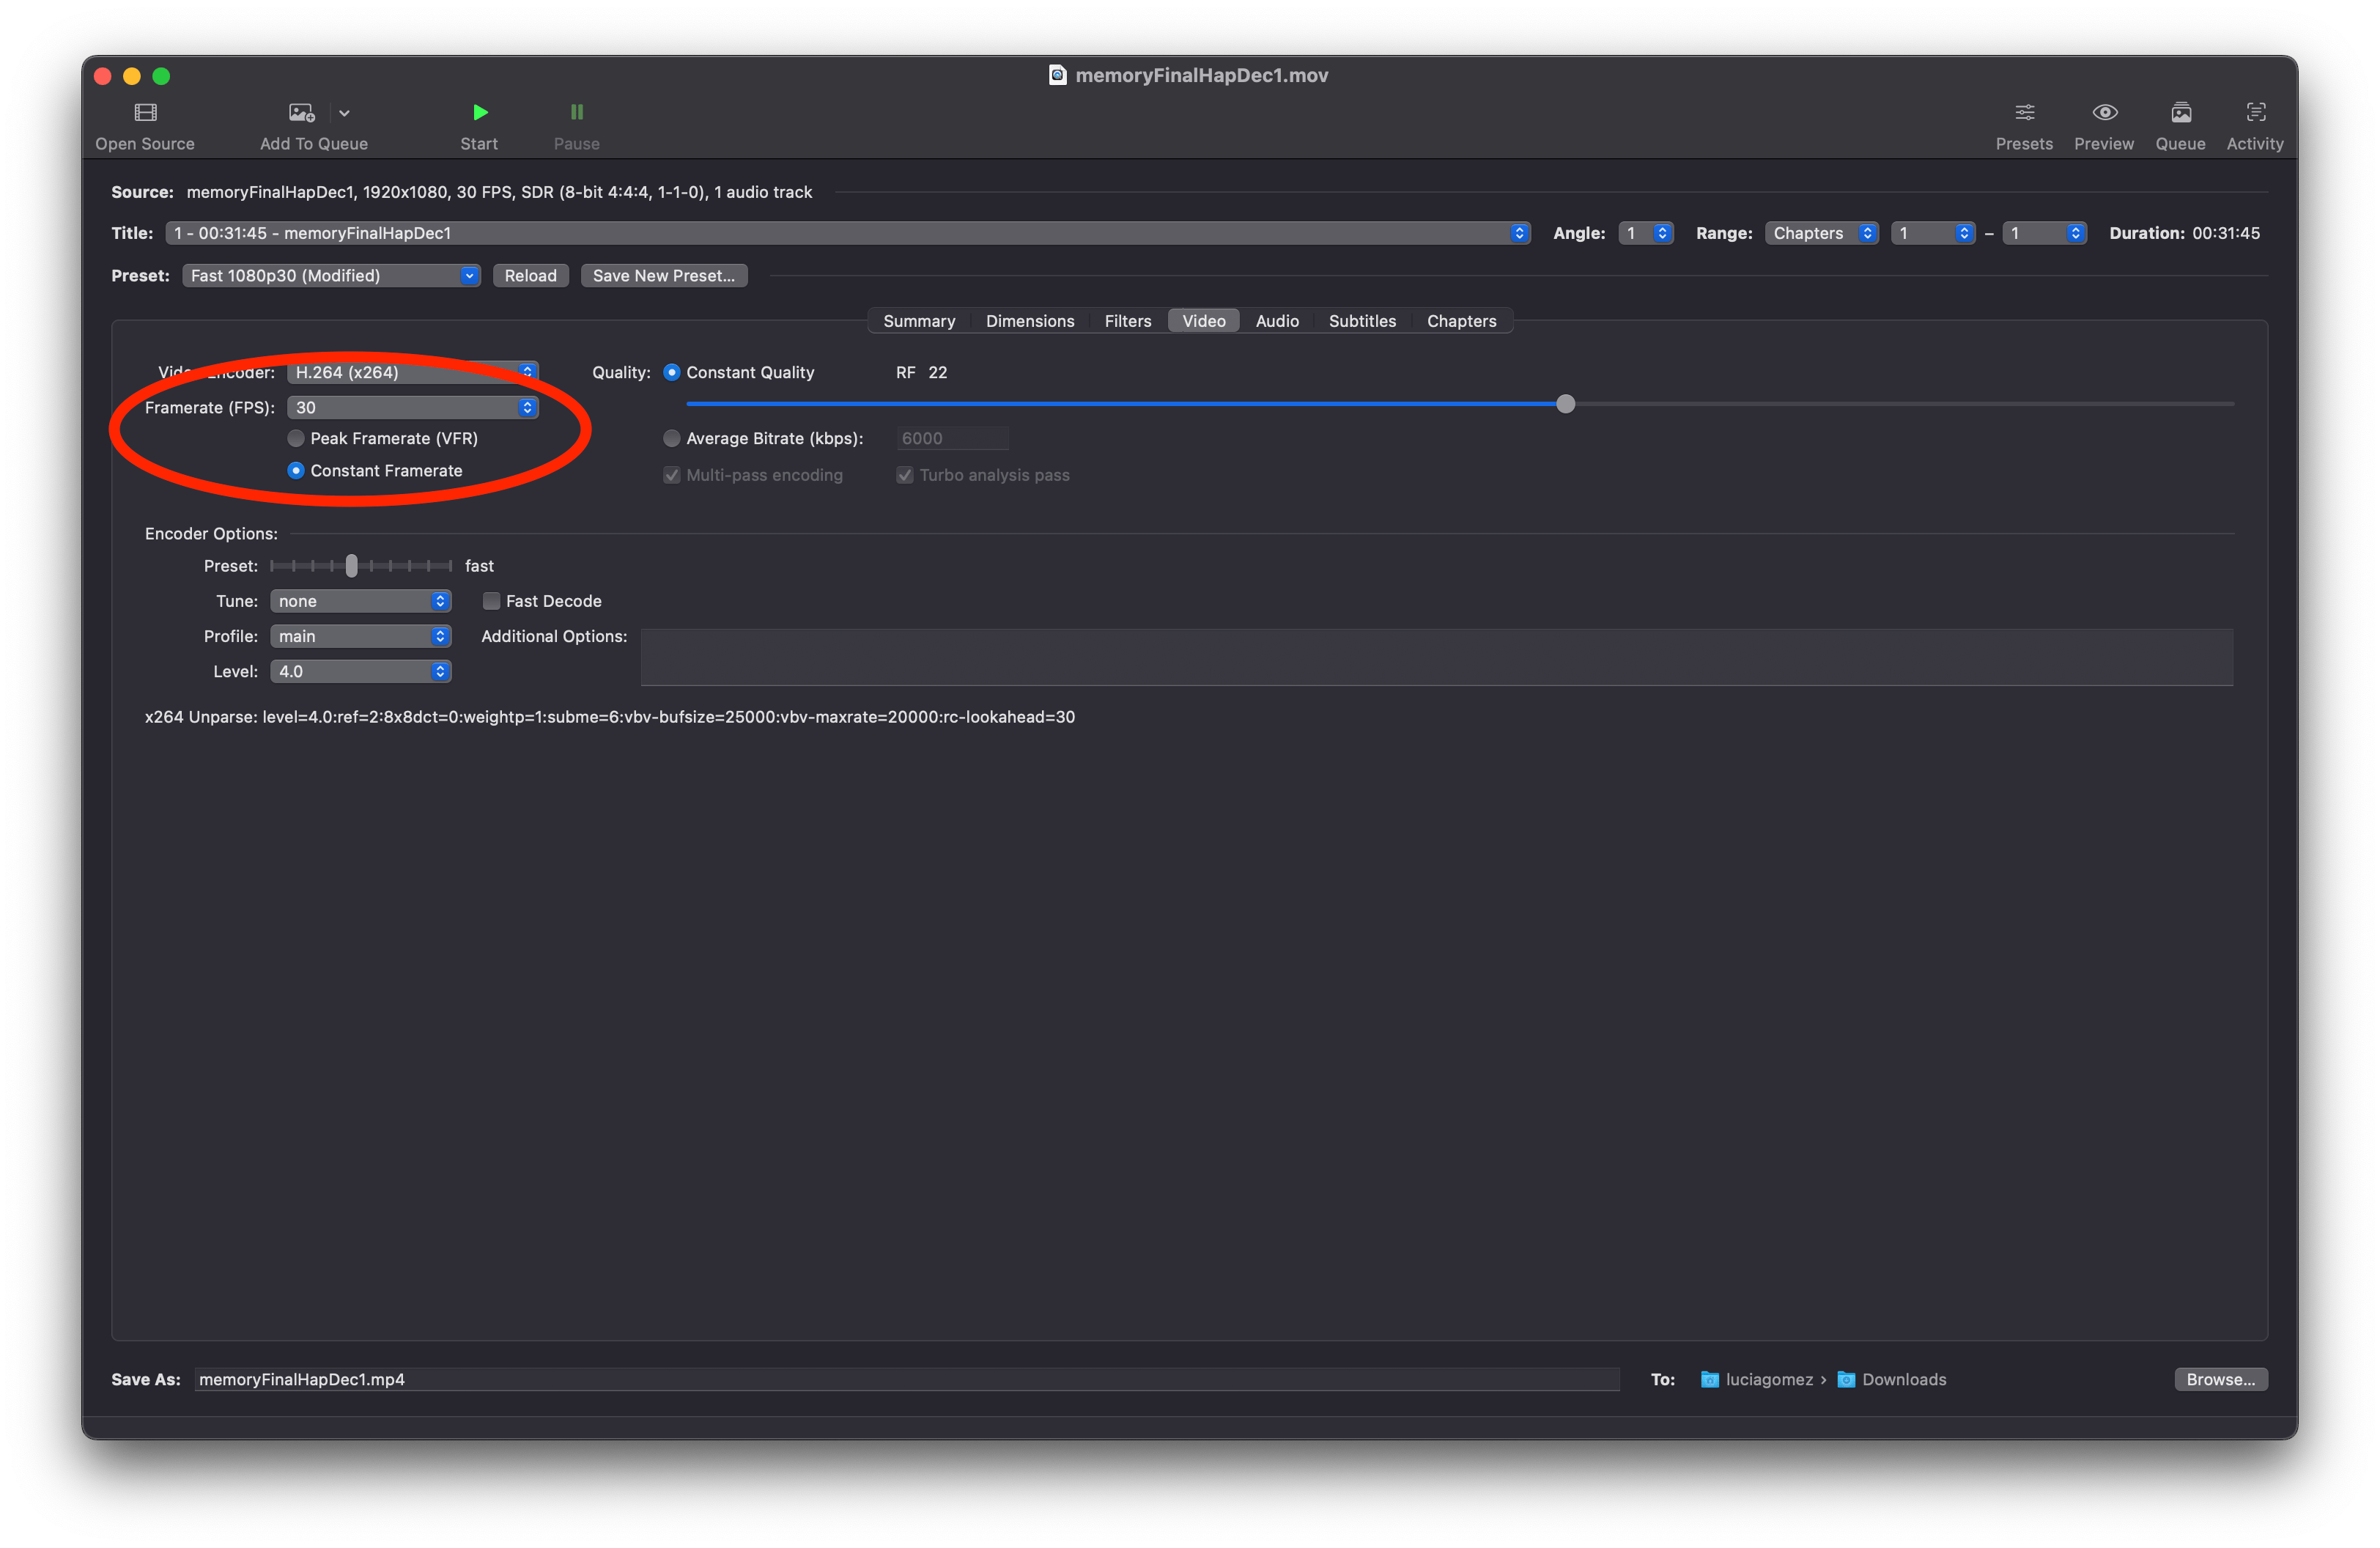 [HandBrake, a program that helps set a constant frame rate on a video file]
TouchDesigner
TouchDesigner is "a node-based visual programming language for real-time interactive multimedia content." I chose to use it over a pure code approach because I knew I needed real-time processing on my large video file, controlled by the magical interactive hand controls. It's easy to integrate physical Arduino sensors into TouchDesigner (TD) via a serial communication node.
Here's what my project file looks like, showing a live preview of one looping memory clip and the node network that made it possible.
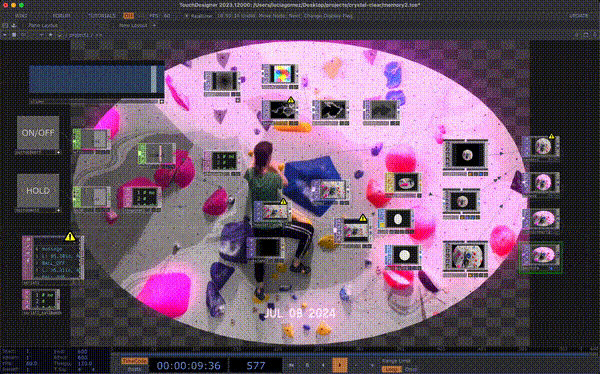 [The TouchDesigner interface and live preview, showing a 1sec clip of me bouldering]
This was a lot of trial and error since I'm new to TouchDesigner (TD). I added some UI components to let me simulate the magical Arduino hand controls, without having to rely on physical sensors for all of my testing.
- Time slider. Controls the video playback, letting me fast forward or rewind. The slider outputs a value between 0-1. Based on this value and the total number of frames in my video file, the pipeline calculates the frame numbers for the start and end of a discrete 1sec memory clip, and sets the video to the start frame.
- ON/OFF button. Toggling this button controls whether the video shows or we see a black screen. This is part of the hand control design that I'll talk about later.
- HOLD button. Toggling this button controls whether the video plays through or repeats a single 1sec clip, looping between the start and end frame numbers determined by the slider.
Most of these controls affect the video playback via Python scripts.
 [The slider and 2 buttons on the left side of the node network]
The only significant issue I ran into was video file optimization. My 40GB video file was so big that TD had a hard time rendering it smoothly, especially when looping a single clip forward and backward. Resident ITP TouchDesigner GOD Armon Naeini suggested that I use a HAP video encoding to make TD happy... I installed a commandline ffmpeg package to do that and it worked perfectly. No frame rate drops even when jumping around between 1sec clips in the video.
Here's how the 1 second clips look when looped. This was a pretty cool project on its own, it felt like I trapped my friends and family in a snow globe.
[Some of my memories shown on mirrored loops]
This was my first time using TD for what I would consider a non-trivial project, and I learned a lot! Including what I like and dislike about it...
Likes
- Live preview. It's easy to chose which node in a pipeline you want to view, and you can view it even as you continue working in the UI. Like the above example where I can see myself climbing and also the network of nodes.
- Code! I've found that most node-based tools really, really don't want you to write code. TD lets you execute Python scripts, or write small inline Python expressions to control almost any parameter. For example,
'add' if op('off')['v1'] == 1 else 'multiply'is a short Python expression that changes the blend mode on a video composition. - Realtime. TD renders things in realtime without making my computer sound like it's going to explode. I was able to jump around in a large video file, integrate Arduino controls, and overlay cool visual effects without anything feeling laggy.
Dislikes
- Documentation. If this is indeed the official TD documentation, it's pretty bad when it comes to writing code. I spent a long time figuring out how to control parameters via code, not via the UI. A lot of the naming conventions weren't obvious.
- Python editor. There's no built-in Python text editor. TD lets you open a file in another editor, like VSCode, but there are some problems with syncing those files. Several times I made some changes to a Python script in VSCode but TD was trying to run a different version of my file.
- UI components. I found it surprisingly hard to add a button UI component to my network that toggles some parameter. I just wanted an ON/OFF button to simulate one of the Arduino hand controls, and it took several nodes to make it work. Again, the official documentation wasn't clear here.
Arduino Controls
After having some media to control in TouchDesigner, I worked on integrating the Arduino-powered controls. I used two Sparkfun ultrasonic distance sensors, one to measure the distance of each hand to the crystal ball. These sensors work best at a range of 2cm-20cm, which is perfect for this small scale project.
 [An ultrasonic sensor]
The code was pretty straightforward. Read the current value of the lefthand sensor and righthand sensor, and based on those values send a message to TD over serial. That message tells TD what to do with the video playback. The whole script is here, but to summarize:
- If both hands are far away from the crystal ball (> 8in), turn the video off. Hands must be near the ball to activate it.
- If both hands are very close to the crystal ball (< 2in), hold the current 1sec clip and loop it. Cupping hands around the ball will hold focus on a memory.
- If a hand is in range but not close enough to trigger loop mode (between 2-8in), then it affects playback speed. Speed is mapped based on the current hand distance, for faster or slower navigation through time. Left hand = backwards in time, right hand = forwards.
The result is sort of a push-pull motion between both hands to flip through my memories.
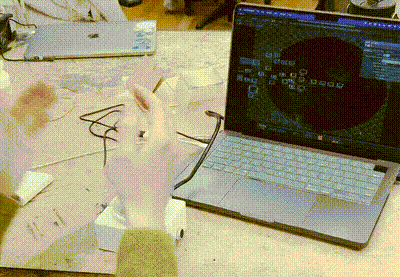 [A demo of the hand interactions controlling TD output]
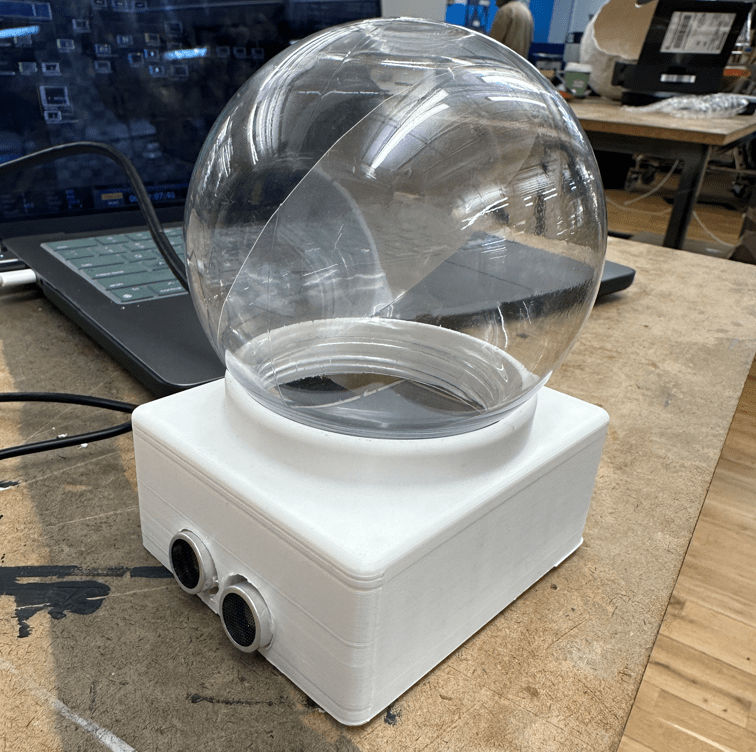
Fabrication
I knew I wanted to use the Pepper's Ghost illusion to achieve a hologram effect of my video floating inside of a crystal ball. I wrote about Pepper's Ghost in a previous blog post. To do this, I needed a hollow, clear sphere with a thin, transparent disc inside of it.
At first I was thinking large scale, and bought 2 of these 12in pet window bubbles. This wins the award for most insane Amazon purchase I've made for a school project.
 [12in diameter plastic hemisphere] [12in diameter plastic hemisphere] |
 [It transforms your dog into a new breed!] [It transforms your dog into a new breed!] |
The angle between the screen and the transparent surface is critical for Pepper's Ghost. But trying to carefully glue a sheet of acrylic or plastic film inside of one half of the sphere while aligning a screen in the other half was NOT working. I questioned my life choices that brought me to the point where I was almost in tears trying to glue a circle to a sphere.
I abandoned the large sphere and moved to a smaller scale. Thankfully it was the holiday season and Michael's had little DIY snow globe kits in stock. I bought almost the exact same plastic globe as seen in this video, with an open base. It was easy to insert a piece of circular plastic film into the sphere and rotate to a precise angle.
[Amazing tutorial of Pepper's Ghost in a spherical container]
I put a small ~3in Raspberry Pi monitor under the bottom for a quick demo before moving forward. It looked great in a dark room! The screen is at the bottom and the image is reflected up into the sphere, like a floating hologram.

Finally I used Fusion to 3D model a structure to hold the sphere and all of the electronics (screen, breadboard + Arduino, distance sensors) and holes for cables (screen HDMI + power, Arduino power).
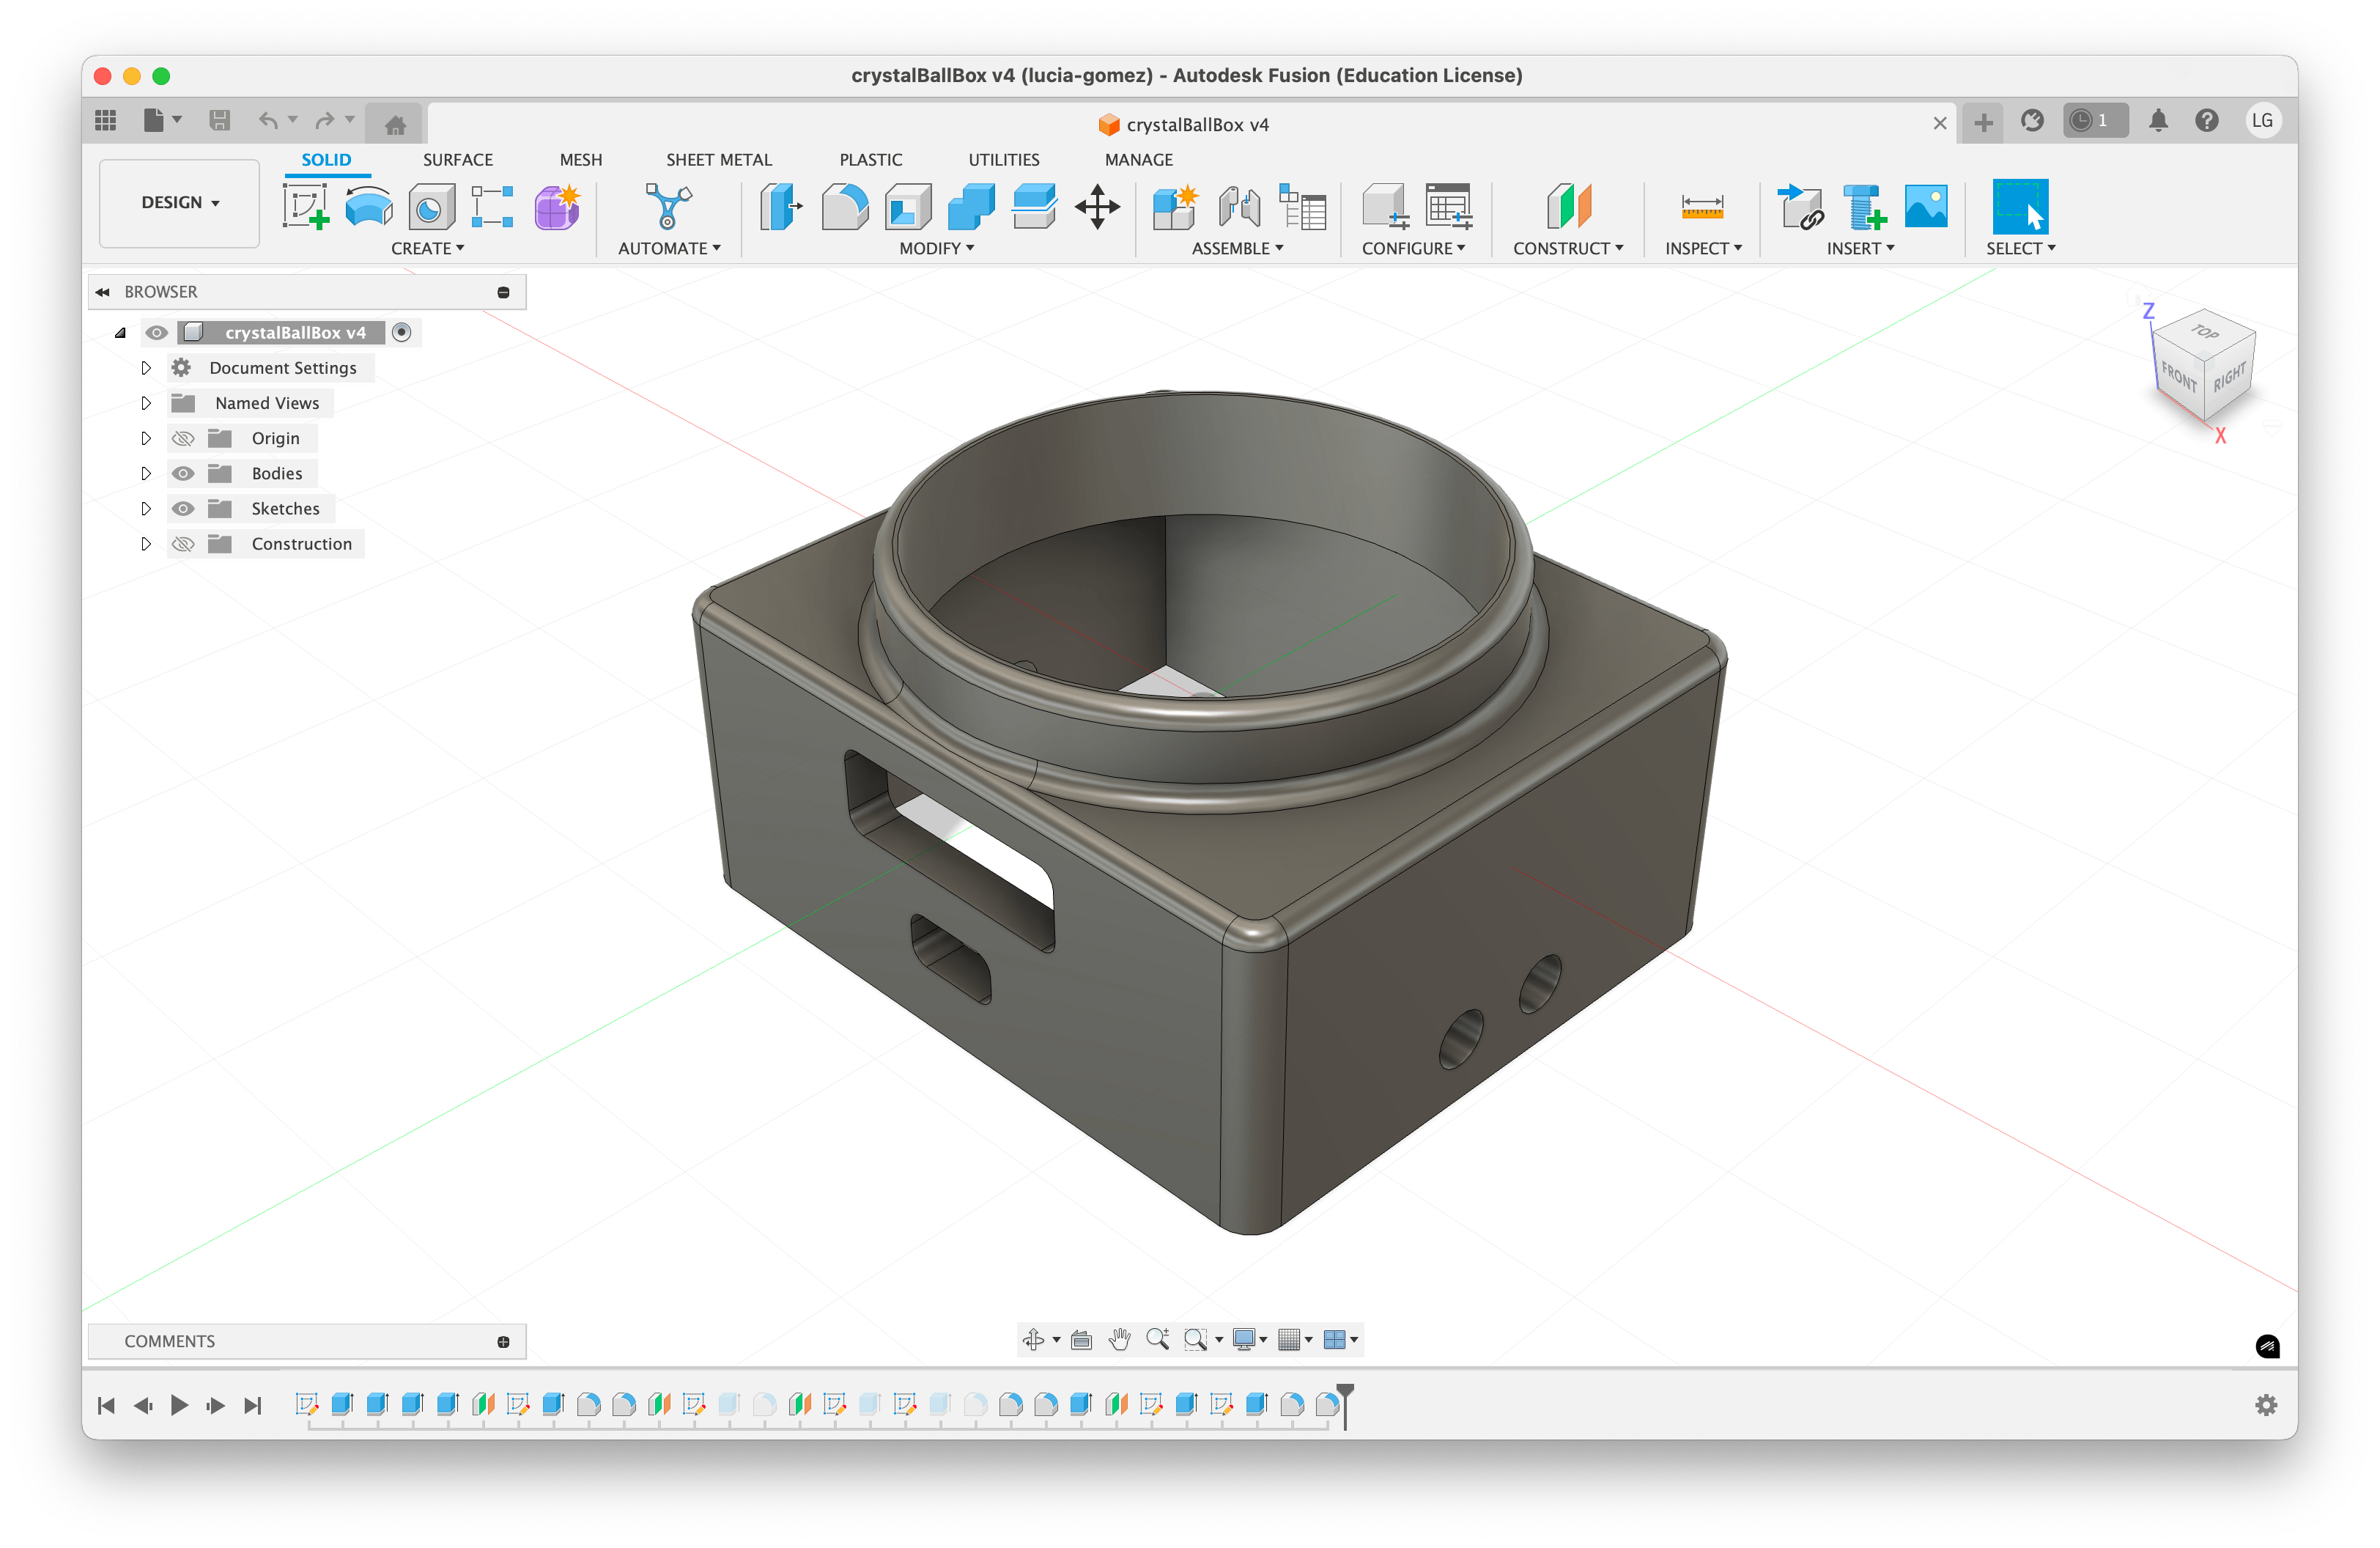 [3D model in Fusion]
The model wasn't my best work, some of the holes were too snug and I had a hard time fitting the breadboard + sensors inside. I got everything fully assembled after some brute force.
 |
 |
Feedback
I got overwhelmingly positive feedback on this project! My classmates and professor were amazed at both the crystal ball format and the dataset itself. People commented that it actually felt like gazing into a crystal ball. Since Pepper's Ghost requires a precise head-on viewing angle, people had to crouch on the floor and get pretty close to the ball to use it. But they said that made the experience feel more intimate, which was fitting for peeking into someone else's memories.
 [First day of ITP orientation] [First day of ITP orientation] |
 [Christmas last year] [Christmas last year] |
 [Prototyping this project!] [Prototyping this project!] |